Just another non-stop weekend building and improving the farm

Since the base was having a “big drill” last week, the Nautilus Museum was closed Thursday and Friday so I had the day off.  Of course, we are always behind on the list of farm projects, so it seemed like a great time to catch up (a little).  In fact, I have yet to meet a farmer who feels everything is just right and caught up on their farm…

The biggest project for the weekend was goat fencing.  I hired 2 high schoolers to work for me Thursday, Friday, and Saturday because I needed the extra hands.  My neighbor Tim has a large backhoe that he brought down to remove a couple of stumps for me.  After that, I put up 1 long stretch of fence to create a corridor between the horses and goats.  Now we can easily go back and forth across the bottom of the property.  Of course, that 12′ wide by 180′ long corridor can also be used as a grazing area for ponies, calf, etc.  Then I built a fully contained by field fence kid area inside the goat pen.  I’ll explain why.

When a doe has kids, the kids get all of momma’s milk for the first 2 weeks.  After that, we start to isolate the kids at night so we can milk the doe in the morning.  For Betty’s kids, we just locked them in the kidding stall at night.  However, since Maggie is due this week, we needed a better/larger solution.  Now, our 30’x30′ kid pen can be used as the overnight isolation area.  I’m sure it will get lots of other use too.

As I have discussed before, we like to recycle as much as possible.  I have previously posted about recycling pallets into goat shelters and chicken coops.  Last week when I went to get another load of pallets, I found out the moving company that supplies us is going out of business.  Bad news for them, but good for us because they are emptying out their warehouses.  That means I was able to get 4’x4′ wood crates and 7’x7′ shipping crates.  Add a recycled door, and what do you have?  How about a storage shed for the rabbitry.  Now all of the rabbit supplies, feed, hay, etc are conveniently located next to the cages (it just needs some paint).

Of course, we had people coming and going all weekend.  Some were here to buy chicks, while other were just here to meet us or catch up.  For example, we placed an ad in the North Stonington Bulletin Board classifieds.  Some neighbors a couple of miles away saw the ad and found our page.  It turns out they have a very similar mindset with slightly different focus.  Check out this blog to learn more about Morning Star Meadows Farms and their Icelandic Sheep!  You can also see what other blogs we like on the right side of our home page.

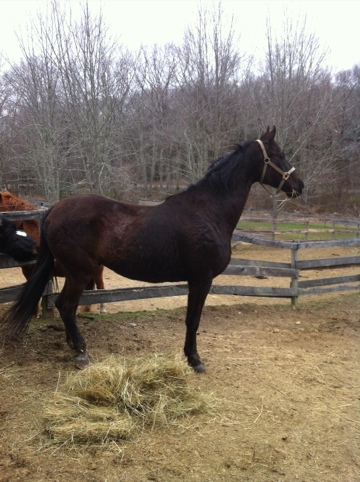
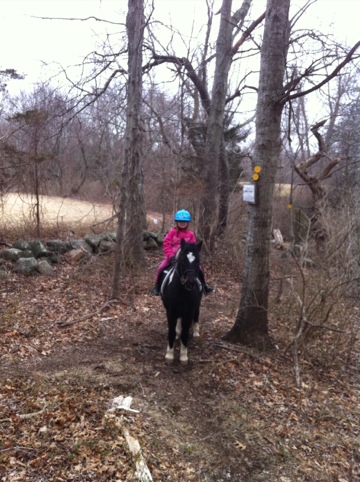
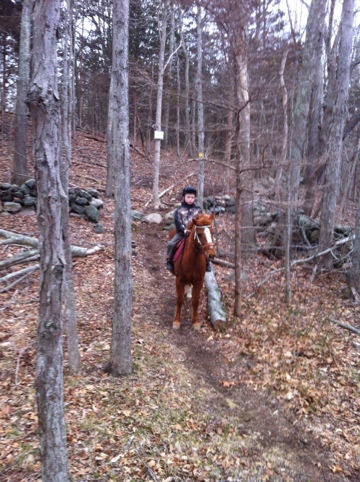
And there was one other little thing.  Turbo.  We were waiting to get serious about finding a new horse for me until we placed Cinder in a new home.  Well, on Wednesday Cinder went to a new home.  On Friday, I test rode Turbo.  And Sunday morning, I brought him home on a 30 day trial.  I never have been very patient.  Vicki approves.

It’s good to be crazy.

Meet Turbo!

20120325-110354.jpg
Only 4 days after Cinder went to his new home, we have the barn filled again. Turbo (SF Galaxy Quest) is an 11 year old, 16.1h National Show Horse (1/2 Saddlebred 1/2 Arabian). His color is Seal Brown and he is already barefoot.
After a short test ride on Friday, I was hooked. We have him on a 30 day trial period to make sure it works out. He has the get up and go that I love, is very responsive under saddle, and has jumping experience. He just didn’t bond with the previous owner. Looks like I found my show horse!

Cinder has a new family

Today we had a woman who lives only a few miles away come and meet Cinder.  She understands the possibly issues with his legs and has decided she would like to have him on her farm.  She is very experienced with horses and has 2 other horses already.  Since we felt comfortable with her knowledge and experience, we have agreed to give her Cinder.  After 11 years in our family, Cinder will move to a new family on Wednesday afternoon.

Relaxing trail ride

This afternoon the temps were in the low 50s so I saddled up King, Alex got Precious, and Vicki prepped Devil. The 3 of us went out for a 45min trail ride. What made this ride different is we went exploring on new trails the horses had not seen and to get there, we have to walk 1/2 mile of road.

The ponies did great along the road. Vicki was a little nervous during the ride, but Devil wasn’t. Better than the other way around.

Along the trail, we came to a water crossing. After a little initial refusal, King finally decided it was safe to cross. Both ponies crossed without a care.

Then we rode around some open fields. King was full of spunk, so we did some cantering circles and a little galloping across the fields while the ponies walked the edges. Alex and Precious did a little trot work, but Vicki decided to just walk (Devil was fine with that).

In the end, it was a great confidence booster for the kids and reaffirms that we have excellent ponies.

20120316-193426.jpg

20120316-193437.jpg

Hard boiled eggs

So I think we’ve found the answer to having hard boiled eggs from our farm fresh eggs without sticking them in the back of the fridge for a week or two. Apparently steaming them instead of boiling and then immediately dunking them in ice water works wonders. The ice water should have plenty of ice in it to stay cold. Yeah no more sticky shells!

Meat chickens

In addition to using eggs, we decided to try our hand at processing our chickens for meat.  In 2011, we processed 42 chickens for our family in the late summer and early fall.  At the time, we rented a plucker to remove the feathers.  Since then, we have built our own plucker.  It takes us about 10 minutes on average to go from a live bird to a shrink-wrapped product for the freezer. 

This year, we will offer meat chickens for sale to others.  We raise excess dual purpose breed roosters for meat.  While there are a number of meat specific breeds available, most notably the cornish cross, we choose to stick with heritage, natural breeds that can be reproduced on our farm.  There are no risks of broken legs from excessive growth, heart attack from overeating, etc.  It takes 4-5 months to raise a rooster for harvest, and that will result in a 3lb average weight bird.  We sell live birds and offer custom slaughter. 

See the Sale Page for pricing and ordering.

Chick hatching on the farm – our homemade hatcher in use

Since we decided to get a little more serious about hatching chicks this year, we needed to increase our capacity.  Chicks require a 21 day incubation period.  We prefer to use an automatic turner in the incubator to eliminate the need to manually turn eggs 3-4 times a day. On day 18, you put the eggs on “lockdown” which means removing the turner and letting the eggs sit still until they hatch.  While a basic still air incubator is made of styrofoam and doesn’t have a fan works fine for the entire cycle, it is actually limited to about 25 days.  That’s because the nominal 21 day incubation results in some hatches out to about day 23.  Then you have to clean it out, reload, etc.

For the initial part of the incubation period, the humidity is kept around 40%.  From lockdown on, it needs to be around 75%.  A limitation of the still air incubator is they don’t do well at trying to raise the humidity.

Our solution was to move the eggs to a different location to hatch.  That means the incubator with automatic turner stays in operation.  Now at day 18, eggs go into the hatcher and the incubator gets new eggs.  Since we are running 2 incubators with turners, we have 41 eggs going to hatch every 9 days (once the cycle is in progress).

Here is our homemade chick hatcher.  It has undergone a few different modifications, but I think the design has stabilized for a while.

The hatcher is made from an old beer fridge I got from a bar (for free).  The compressor was no good, so I removed the compressor and cooling coils.

I reversed the polarity of the fan so it draws air up through the unit instead of blowing on the top shelf.  I also added a rheostat to make it a variable speed fan.

I kept the fluorescent light so we can see the chicks hatching.  Since the bar planned to reuse the shelves in a new unit, I made shelves out of 2x2s and wire mesh.  Since I took these pictures, we did change to a basket setup instead of the cat litter boxes so the air circulates better.

I installed a floor air conditioning register in the side to allow for fresh air to enter the unit as the chicks hatch.  The cables you see going in are for the digital thermostat and humidistat.  You can see the small controller on the side in the first picture (it is blue).  The digital controller was $70, but absolutely worth the improvement.

The heat source is a 125 Watt heat lamp that I wired into the bottom.  We are using a humidifier in the bottom to keep the humidity in the appropriate range.  The digital controller regulates the temperature within about 1 degree and the humidity within about 5%.

The total cost of materials was about $100 and the end result is a hatcher that gives up plenty of room to increase production in the future and we got an 80% hatch rate out of our last batch of eggs.  Using a still air incubator, our best ever was about 60%.

The story of our lives with horses. And goats.